


I didn’t grow up eating pie. In fact, my parents are Sicilian and pie just wasn’t a big thing for us. Cannoli on the other hand, we could eat them for breakfast lunch and dinner. But that’s why coming up with a great gluten free pie crust was so rewarding. It was a brand new challenge and one that I am completely thrilled with.
I realized last summer how much people love to eat pie and it sort of became a thing for me too. I learned about all the different flavors a pie could have and how each and every one was different and unique. Except I hadn’t found a gluten free pie crust I absolutely loved.
So I began to embark on what (I thought) would make the perfect gluten free pie crust. I started doing some research and asking questions. Then I looked to see what was already out there and I sampled a couple ready made crusts.
I did find a store bought one that seems ok in a pinch but it really doesn’t compare to the recipe I’m about to share.
I also researched how the popular “regular” bakers made their crusts. After all, you know how I feel about regular bakers having all the fun. I absolutely love following regular bakers for inspiration because I love the challenge of making their gorgeous desserts my very own. So let’s just say this pie crust is The Pioneer Woman meets Sally’s Baking Addiction.
A couple of years ago I developed a recipe that I still love very much, but the flour blend is a little too lengthy. I shared this recipe in my Gluten Free Thanksgiving guide, which has all the fixings for your thanksgiving feast. But last year I was able to update that wonderful resource with this great recipe.
But as you know, with practice, gluten free baking does become easier and the possibilities are truly endless. And after a whole year of sampling different flour blends and recipes, I believe this recipe really tops them all.
And it’s not just the recipe that’s important, it’s definitely the technique! Pie crust is pastey, and can be crumbly. Mine tends to be pastey if the butter and shortening become too warm. But if you follow my technique, I promise you will have the gluten free pie crust of your dreams.
My ingredients
As with all of the recipes in which I mix my own flour I’m sure you know by now that I love to use Authentic Foods Brand flours. I actually tried to make this recipe with King Arthur’s All Purpose but it just didn’t seem like anything special to me.
I highly encourage you to use this brand because of the special texture and fine grind it has. For instance, you can open 3 different brands of brown rice flour and realize that they are all completely different in texture. Therefore leaving you with very different results.
Trust me, Authentic Foods is what you should have in your pantry. And just so you know, I receive no compensation for endorsing it. But hey, since I already do endorse it, I wonder if I could at least get some freebies or discounts for you all. Stay tuned!
My crust is dairy free and egg free as well. I use very very cold Earth Balance butter, chilled spectrum palm shortening and Bob’s Red Mill egg replacer. I would suggest making this recipe as it is written first before you decide to tweak it with real butter and eggs.
Regardless I want to see your results. I am currently only sharing this recipe with the members in my Stay Gluten Free Community. So please post your pics in the group and get entered to win your grand prize for our baking challenge.
My Method
The technique I use to make this crust is very specific. Make sure you are using chilled butter and shortening and ice cold water when you mix the dough. Divide the dough into two balls, one for bottom crust and one for the top.
Before you chill the dough you will want to flatten it into two flat circles on a piece of parchment paper. See my “Look Over My Shoulder” video below for all the visuals. Push the dough out from the middle out to the sides. Very similar to how we make my gluten free pizza crust.
Once the bottom crust is flattened put another piece of parchment paper over the top and carefully flip it over onto the pie pan. Again, you can see this in the video below.
Refrigerate this crust and begin working with the top crust. With a straight edge you will want to cut the strips (for a lattice) or make shapes for your top crust. Once everything is cut, place this tray in the refrigerator for 30 minutes.
Begin working on your filling and preheating your oven at this time. Once your filling is complete you can put it in the bottom crust of the pie and keep it in the refrigerator until the 30 minutes have passed.
Once you are ready to put your pie together take the top crust tray out of the refrigerator and begin to let it sit for a few minutes. We want the strips to be pliable but not so stiff that they will break. I show you a little example in the video.
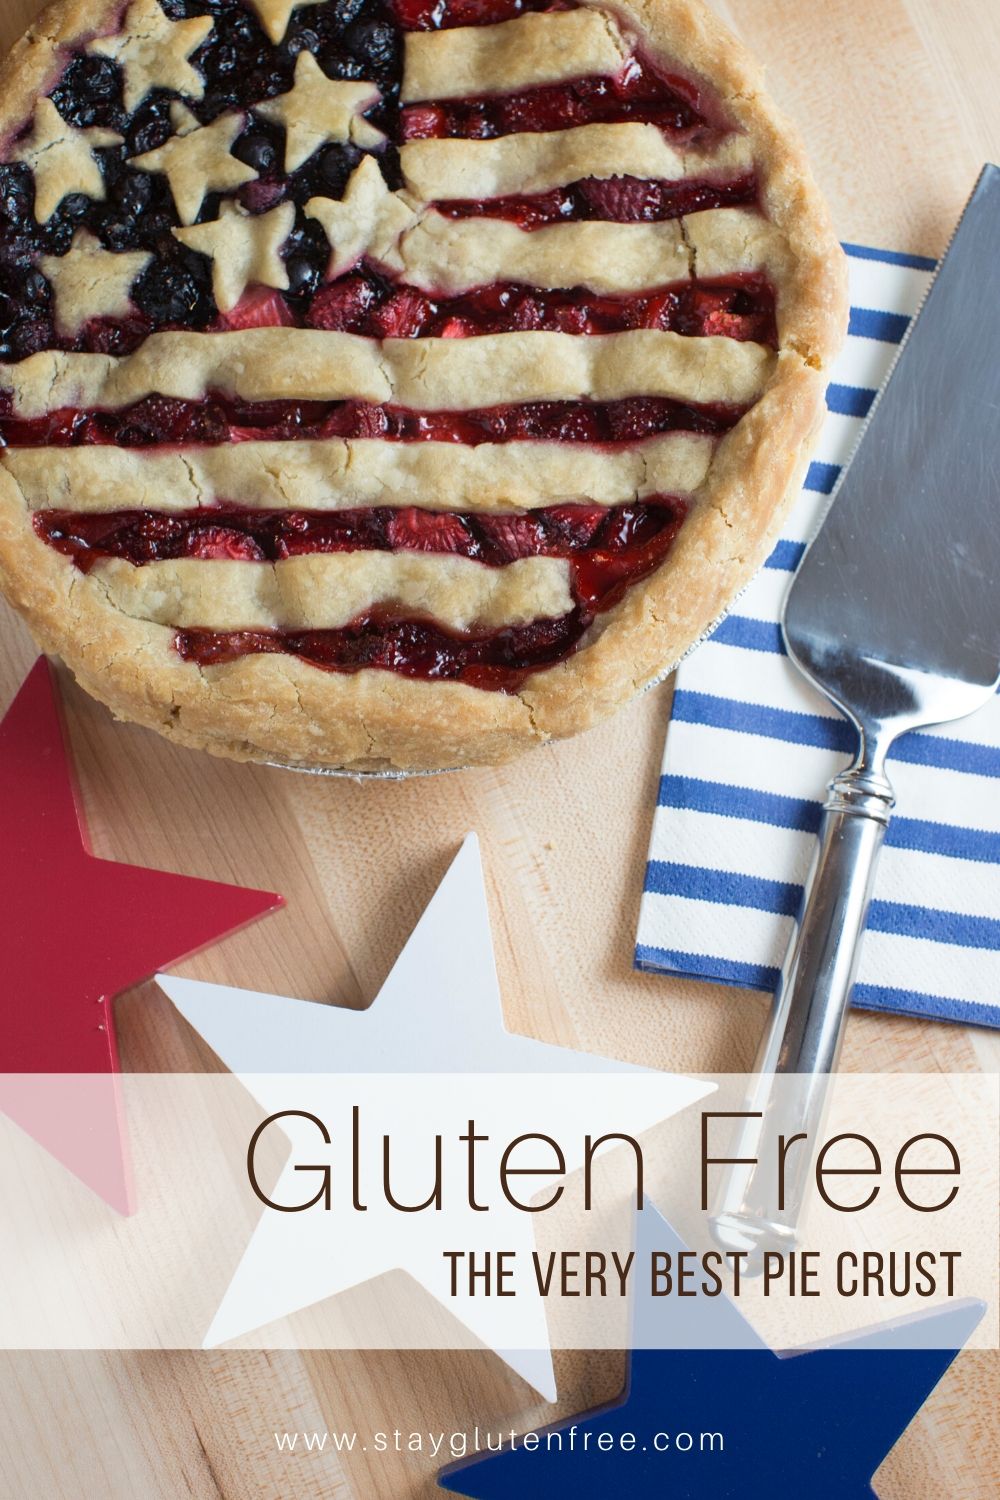
Once the strips or shapes are ready to be easily picked up without being completely melted take your bottom crust out with filling and get to work creating your pie-fection😊
With a brush, lightly glaze the top crust with some So Delicious coconut milk and dust the top with some coarse sugar (I used turbinado sugar). The sugar is completely optional.
Bake on a cookie sheet uncovered in the oven at 425 for 10 minutes and without opening the oven door reduce the temp to 350 and bake for the remaining time. Make sure to watch it closely to make sure the edges do not brown to quickly.
Take a “look over my shoulder” to see exactly how to make this crust
I am so excited about our baking challenge. I cannot wait to see your pies. Thank you for trusting me with your time and taste buds. I seriously hope this restores your faith in gluten free pies and puts smiles on the faces of your loved ones.
Until Next Time!


The Best Gluten Free Pie Crust
Ingredients
- 126g (about 1 cup) Brown rice flour
- 126g (about 1 cup) Sorghum
- 63g (about 1/2 cup) Potato starch
- 63g (about 1/2 cup) Arrowroot
- 1 1/2 tsp Xantham gum
- 1 tsp salt
- 115g (1/2) cup Earth Balance butter sticks chilled
- 126g (3/4) cup Spectrum Palm Shortening chilled
- 1 tbsp Bob's Red MIll Egg Replacer
- 2 tbsp Warm water
- 1 tbsp Apple cider vinegar
- 8 tbsp Ice cold water
- 1 tbsp So Delicious Coconut Milk To replace brushing with egg wash before baking
- 1/2 tbsp turbinado sugar (optional) To sprinkle over the top before baking (optional)
Instructions
Pie Crust
- Measure and weigh the spectrum palm shortening and place it with the butter in the refrigerator for at least 1 hour.
- In a medium bowl whisk together brown rice flour, sorghum, arrowroot, potato starch, xanthan gum, and salt. Set aside.
- In small bowl, add the tbsp of Bob's egg replacer, but do not add the water yet to activate.
- Once your butter and shortening have chilled, remove them from the refrigerator and begin mixing them into the dry mixture using a pastry cutter. Keep mixing until you get a coarse crumb-like consistency.
- Next add the 2 tbsp of warm water to the egg replacer, stir and let sit one minute to thicken while you grab a tall glass of ice cold water. (Be sure to add the ice)
- Then add your thickened egg replacer mixture and apple cider vinegar ato the flour and slowly begin forming your dough as you add 1 tbsp at a time of the ice cold water. No more than 8 tbsp.
- Your dough should now be formed. Divide it evenly into two balls
- On a piece of parchment paper begin spreading one of the dough balls from center to edge using your hands. Feel free to use a little brown rice flour for dusting your fingertips
- Refer to the "look over my shoulder" video for my technique flattening and shaping the pie dough.
- Once your dough is flattened into a flat circle, with one hand on the top of the crust and one hand on the bottom, carefully flip the pie dough and let it fall into the pie pan.
- Carefully align and smooth out any edges that may need to be fixed. Cover with a piece of parchment paper and place in the refrigerator.
- On a another piece of parchment paper repeat flattening the second dough ball using my same technique from the video. Except this flattened circle will get placed on a lined cookie sheet.
- Then with a either a dough scraper or a smooth knife begin cutting strips making sure to leave a little room between each one so that you can grab them when it's time.*
- Once all of the strips are cut. Cover them with another piece of parchment paper and place in the refrigerator.
- Start your timer for 30 minutes now.
- Preheat oven to 400 degrees and begin to prepare your filling. Fill the bottom pie crust and place it back in the refrigerator until the full 30 minutes have passed.
- Once 30 minutes have passed remove the pie crust and strips from the refrigerator.
- Keep a close eye on the strips. Once they begin to soften a bit, grab them as I show you in the video and begin making the top crust for your pie.
- Once your pie is fully designed. Brush a little bit of coconut milk gently over the top and sprinkle some coarse turbinado sugar (optional).
- If your oven is not fully preheated, place completed pie back in the refrigerator until your oven is ready. This can also be used as a make ahead tip.
- When you are ready to bake the pie, place it on top of a cookie sheet and bake at 400 for 20 minutes on the middle oven rack.
- Once 20 minutes has past, reduce your oven temperature (DO NOT open your oven) to 375 and bake the remaining 30-35 minutes or until your pie has a dusting of color.
- Do not worry if your filling looks runny, it will gel as it cools.
- Let cool completely or serve slightly warm and enjoy!
Cherry pie filling
- In a medium mixing bowl, add 3 cups of "thawed" cherries, 3/4 cups granulated sugar, 2 tbsp of arrowroot, 1 tbsp fresh squeezed lemon juice, 2 tsp of vanilla and stir
- If there is a lot of time left, remove the pie crust (in pan) from the refrigerator, add the filling and place back in the refrigerator.
Notes