


My son has never had a real cake pop and I’ve never been able to find a gluten free cake pop we could eat. But every time we pass the Starbucks at Target he always comments on how delicious they look. But just the vanilla/white ones of course;)
This was my first attempt in making a real cake pop. It was also my first time making a white chocolate coating.
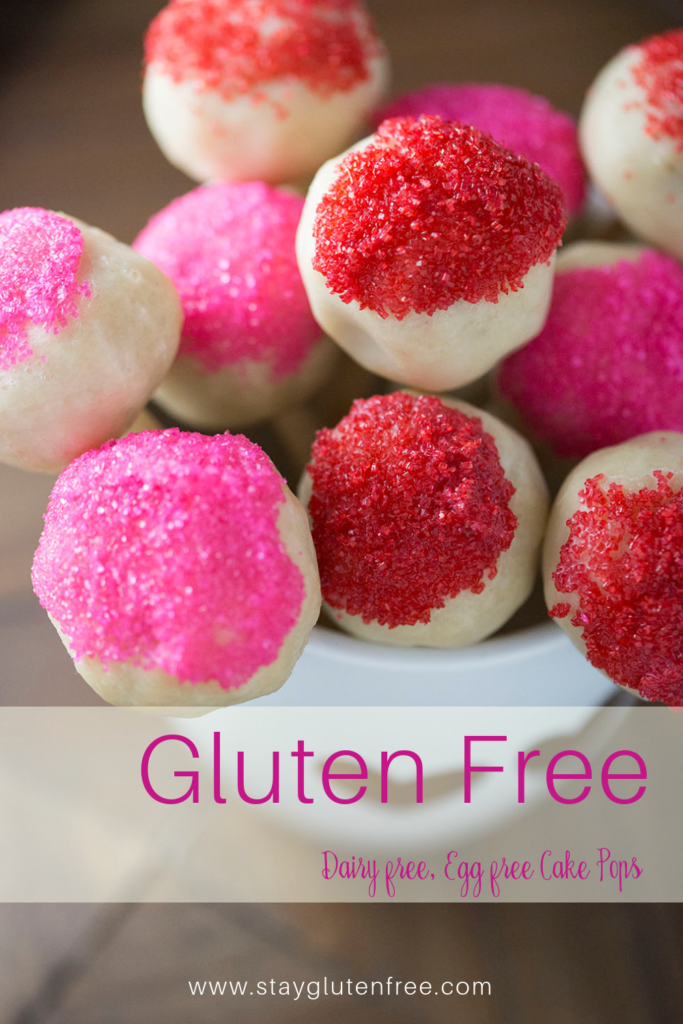
It came out fantastic and I was so excited for my son to try these delicious treats.
I had know idea how much cocoa butter (first timer here) really tastes like chocolate. And I discovered that it isn’t the color of the chocolate my son doesn’t like, but the actual flavor (and smell).
So as he’s grabbing a cake pop and my excitement is rising, he takes one sniff and says, “why does this smell like chocolate?”😩
Oh well, at least now he knows what a real cake pop tastes like. I’m still hoping for the day that he will join me in my love of all things chocolate.
Pin it here–>
My Ingredients
This recipe is basically just cake and icing. So I had some choices. Use Betty Crocker’s box cake mix, make my own recipe I developed last year, or try a new recipe with King Arthur’s all purpose gluten free flour. I decided to try a new cake recipe with King Arthur’s since I had never done that before and I was adapting another great recipe from Sally’s Baking Addiction. I am so glad I did this, because this cake turned out to be outstanding and I didn’t have to mix my own flour. It’s important to know that I measured in grams again so please use a scale to make sure your results turn out like mine. And since we are dairy free as well, I decided to use canned coconut cream instead of just regular coconut milk or making my own buttermilk. It’s really easy to find at the grocery store. At Whole Foods it is often in the international aisle, not the baking aisle.
I kept the leftover coconut cream to use in the frosting. Be sure all of your ingredients are room temperature so that your powdered sugar does not clump.
My Method
The only think you have to bake with these cake pops is the cake. I also baked the cake in a 9 inch springform pan which although I have owned one for many years, I have never ever used it. And I now think it is hands down the very best cake pan around. I didn’t even use my even bake strips. The cake baked beautifully.
Once the cake is baked and cooled completely, you will crumble it up into small pieces. Then you will make your with your stand mixer. Once the is made, just pour the cake crumbs over the top and mix them into the icing with your paddle attachment. Then take tablespoon size scoops and roll each into round balls. Place each one onto a lined cookie sheet and refrigerate for at least 2 hours. I actually made mine in two parts. I refrigerated my pops over night and coated them the next day.
Before you begin coating the pops you will need a way to allow the pops to dry. You can buy a styrofoam block from Michaels or poke holes into a shoe box (like I did). It doesn’t have to be anything fancy at all.
I searched the internet for some vegan white chocolate coating and found this one that was absolutely delicious. It’s called 4-Ingredient Vegan White Chocolate.
The one thing I changed in this recipe was that I used organic cane sugar instead of the coconut sugar that it called for. I didn’t want it to taste to much like coconut. What I found was that the cane sugar didn’t dissolve very well and sat at the bottom of the mixture. I had to stir it regularly. This recipe also makes a lot! More than you will need. But it really was delicious in spite of that.
It is important that the cake pops are chilled when they are dipped. Dip the stick in the coating first, then poke it through the cake ball and submerge it completely into the coating making sure to cover it up to the where the stick was inserted.
Add sprinkles to the coated cake pops and allow them to dry for at least an hour. Once dry and the coating has hardened place them back into the refrigerator and enjoy them as you desire.
It’s been a long time since I had a real cake pop. These were such a special treat. I hope you and your kids enjoy them as well.
Until next time!


Gluten Free Cake Pops
Ingredients
Cake
- 287g (1 2/3 cups) King Arthur's All Purpose Gluten Free Flour
- 1/2 tsp Xanthan gum
- 1/2 tsp baking powder
- 1/4 tsp baking soda
- 1/2 tsp salt
- 1/2 cup Earth Balance butter sticks 1 stick softened to room temperature
- 180g (1 cup) Organic cane sugar
- 1 tbsp Bob's Red Mill
- 2 tbsp Warm water
- 2 tsp Vanilla extract
- 1 cup organic coconut cream
- 1/2 tsp Apple cider vinegar
Frosting
- 1/2 cup Earth Balance butter sticks 1 stick softened to room temperature
- 2 cups Organic Powdered Sugar
- 2 tsp Coconut cream or milk
- 1 tsp Vanilla xtract
Coating
- Click on link https://www.huffpost.com/entry/4ingredient-vegan-white-c_n_3481052
Instructions
- Preheat oven to 350 degrees Fahrenheit and grease a 9 in cake pan (a springform pan will work best).
- Make the cake first. In medium bowl combine flour, xanthan, baking powder, baking soda and salt. Whisk together and set aside.
- With stand mixer and paddle attachment cream butter and sugar together for a couple of minutes.
- In separate small bowl add the egg replacer and water and let it sit one minute to thicken.
- Add the thickened egg replacer, vanilla and coconut cream to butter/sugar mixture. Mix until combined making sure to scrape down the sides of the bowl to include all ingredients.
- With mixer on low slowly add the dry mix and mix into a batter. Batter will be somewhat thick.
- Pour batter into cake pan and spread it out evenly. Bake for 30-32 minutes. Test it with a toothpick to be sure it is baked thoroughly.
- Allow the cake to cool completely.
- Next make the frosting.
- Begin by creaming the butter, vanilla and coconut milk until nice and smooth in stand mixer with paddle attachment.
- Add the powdered sugar and mix until frosting is formed.
- Crumble the cooled cake and add it on top of the frosting. Mix until both cake and icing are completely combined and smooth.
- Scoop out 1 tablespoon size portions and roll into balls. Place each one onto a parchment paper lined cookie sheet. Refrigerate cake ball for at least 2 hours.
- Re-roll each cake ball to smooth them out further. Place them back into the refrigerator.
- Make coating. Get the full link above in the post.
- Remove the cake balls from the refrigerator 2-3 at a time. This will ensure that they stay chilled.
- Dip each stick into the coating. Then pierce the cake ball with the stick and completely submerge the cake ball into the coating. Lift it out of the coating, then dip again.
- Apply sprinkles and place on styrofoam block or box as I mentioned above.
- Allow to dry for at least one hour.
- Place cake pops back in the refrigerator and enjoy as you wish!
Notes